Showing 224 results
Archival description 
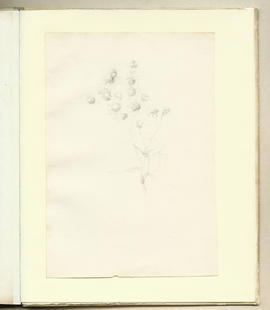
The Magazine: Volume 1 (Page 2)
- MC/A/15/1/p2
- Part
- 1893
The Magazine: Volume 1 (Page 5)
- MC/A/15/1/p5
- Part
- 1893
The Magazine: Volume 1 (Page 16)
- MC/A/15/1/p16
- Part
- 1893
The Magazine: Volume 1 (Page 18)
- MC/A/15/1/p18
- Part
- 1893
The Magazine: Volume 1 (Page 20)
- MC/A/15/1/p20
- Part
- 1893
The Magazine: Volume 1 (Page 23)
- MC/A/15/1/p23
- Part
- 1893
The Magazine: Volume 1 (Page 29)
- MC/A/15/1/p29
- Part
- 1893
The Magazine: Volume 1 (Page 30)
- MC/A/15/1/p30
- Part
- 1893
The Magazine: Volume 1 (Page 31)
- MC/A/15/1/p31
- Part
- 1893
The Magazine: Volume 1 (Page 37)
- MC/A/15/1/p37
- Part
- 1893
The Magazine: Volume 1 (Page 38)
- MC/A/15/1/p38
- Part
- 1893
The Magazine: Volume 1 (Page 39)
- MC/A/15/1/p39
- Part
- 1893
The Magazine: Volume 2 (Page 4)
- MC/A/15/2/p4
- Part
- Apr 1894
The Magazine: Volume 2 (Page 6)
- MC/A/15/2/p6
- Part
- Apr 1894
The Magazine: Volume 2 (Page 20)
- MC/A/15/2/p20
- Part
- Apr 1894

The Magazine: Volume 2 (Page 23)
- MC/A/15/2/p23
- Part
- Apr 1894
The Magazine: Volume 2 (Page 26)
- MC/A/15/2/p26
- Part
- Apr 1894
The Magazine: Volume 2 (Page 27)
- MC/A/15/2/p27
- Part
- Apr 1894
The Magazine: Volume 2 (Page 29)
- MC/A/15/2/p29
- Part
- Apr 1894
The Magazine: Volume 2 (Page 33)
- MC/A/15/2/p33
- Part
- Apr 1894
The Magazine: Volume 2 (Page 36)
- MC/A/15/2/p36
- Part
- Apr 1894
The Magazine: Volume 2 (Page 48)
- MC/A/15/2/p48
- Part
- Apr 1894
The Magazine: Volume 2 (Page 49)
- MC/A/15/2/p49
- Part
- Apr 1894
The Magazine: Volume 2 (Page 52)
- MC/A/15/2/p52
- Part
- Apr 1894
The Magazine: Volume 2 (Page 54)
- MC/A/15/2/p54
- Part
- Apr 1894
The Magazine: Volume 2 (Page 55)
- MC/A/15/2/p55
- Part
- Apr 1894
The Magazine: Volume 2 (Page 57)
- MC/A/15/2/p57
- Part
- Apr 1894
The Magazine: Volume 2 (Page 61)
- MC/A/15/2/p61
- Part
- Apr 1894
The Magazine: Volume 3 (Page 2)
- MC/A/15/3/p2
- Part
- Nov 1894
The Magazine: Volume 3 (Page 14)
- MC/A/15/3/p14
- Part
- Nov 1894
The Magazine: Volume 3 (Page 15)
- MC/A/15/3/p15
- Part
- Nov 1894
The Magazine: Volume 3 (Page 22)
- MC/A/15/3/p22
- Part
- Nov 1894

The Magazine: Volume 3 (Page 26)
- MC/A/15/3/p26
- Part
- Nov 1894
The Magazine: Volume 3 (Page 27)
- MC/A/15/3/p27
- Part
- Nov 1894

The Magazine: Volume 3 (Page 41)
- MC/A/15/3/p41
- Part
- Nov 1894
The Magazine: Volume 3 (Page 43)
- MC/A/15/3/p43
- Part
- Nov 1894
The Magazine: Volume 3 (Page 44)
- MC/A/15/3/p44
- Part
- Nov 1894
The Magazine: Volume 3 (Page 46)
- MC/A/15/3/p46
- Part
- Nov 1894
The Magazine: Volume 3 (Page 48)
- MC/A/15/3/p48
- Part
- Nov 1894
The Magazine: Volume 3 (Page 52)
- MC/A/15/3/p52
- Part
- Nov 1894
The Magazine: Volume 3 (Page 55)
- MC/A/15/3/p55
- Part
- Nov 1894
The Magazine: Volume 3 (Page 57)
- MC/A/15/3/p57
- Part
- Nov 1894
The Magazine: Volume 3 (Page 62)
- MC/A/15/3/p62
- Part
- Nov 1894
The Magazine: Volume 3 (Page 65)
- MC/A/15/3/p65
- Part
- Nov 1894
The Magazine: Volume 3 (Page 69)
- MC/A/15/3/p69
- Part
- Nov 1894
Fragments of lampshade(s) for Library, Glasgow School of Art (Version 7)
- MC/F/96ZZ/v7
- Part
- 1907-1909
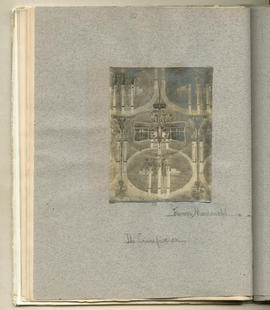
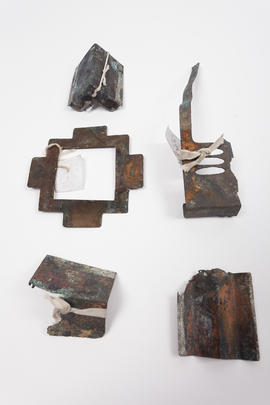
The library was destroyed by fire on 23 May 2014, though many metal and glass fragments from the lights were subsequently salvaged. Originally, and according to Mackintosh’s preparatory sketches, there were thought to be 53 individual lights in the library, each with punched holes in the inner reflectors which allowed light to pass through blue and purple glass. The central array was made up of 12 small canisters attached to the light frame on the ceiling, with eight medium pendants and five large pendants hanging below. There were an additional twelve medium canisters attached to the coffered ceiling both above and below the library balcony, making 24. Originally there were also four additional medium hanging pendants in each of the south and western window bays, though these four lights, and the medium canister in the librarians office, had all been removed before the fire in 2014, meaning there were 48 in the library. This small selection of salvaged lights fragments has been retained as evidence of the fire tragedy. These fragments are also surplus to the needs of Rodney French of Lonsdale and Dutch, Edinburgh who has been tasked with reconstructing the entire set of library lights, whilst reusing as much of the surviving fragments as possible.
Mackintosh, Charles Rennie
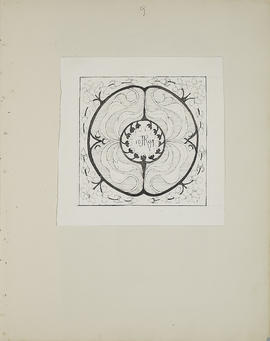
Coat of Arms for the stairwell at Glasgow School of Art (Version 1)
- MC/F/100/v1
- Part
- 1897-1899
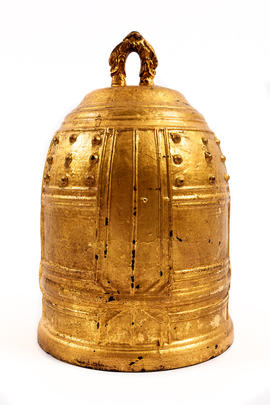
This item was lost in the fire in The Mackintosh Building at The Glasgow School of Art on 15th June 2018. The bell is all that remains.
The symbols which form the Glasgow coat of arms all refer to miracles performed by St. Mungo, the patron saint of the city who is normally represented with these emblems on the coat of arms. They first appeared on the seals of bishops of Glasgow, the fish on the seal of William Wishart in 1270, the bird on the seal of Robert Wishart in 1271. They were used together for the first time on the seal of the Chapter of Glasgow in 1488. The salmon with the ring in its mouth refers to the story of the local Queen who gave her ring to a knight she was in love with, the jealous King stole the ring from the knight while he was asleep and then demanded it back from the Queen, having thrown it into the Clyde. In desperation she prayed to St. Mungo who told his followers to cast their fishing nets in the river and bring him the first fish that they caught, a salmon with the Queen's ring in its mouth. The tree represents the green hazel twig which Mungo restored to life after his companions had killed it. The bell represents the service bell used in Mungo's church and still in Glasgow until c1700. Mackintosh's tree is highly abstract in its Art Nouveau 'whiplash' spirals untypical of his work. The bird is a modern replacement of the stolen original.
Results 1 to 50 of 224