The Magazine: Volume 3 (Page 64)

The Magazine: Volume 3 (Page 66)
The Magazine: Volume 3 (Page 70)
Wall hanging designed for The Dug-Out, Willow Tea Rooms, Glasgow
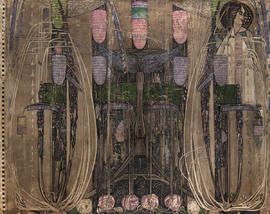
Panel for the Rose Boudoir, Turin
Panel for the Rose Boudoir, Turin
Panel for the Rose Boudoir, Turin
Panel for the Rose Boudoir, Turin
Panel for the Rose Boudoir, Turin
Panel for the Rose Boudoir, Turin
Panel for the Rose Boudoir, Turin
Panel for the Rose Boudoir, Turin
The Magazine: Volume 1 (Page 2)
The Magazine: Volume 1 (Page 5)
The Magazine: Volume 1 (Page 16)
The Magazine: Volume 1 (Page 18)
The Magazine: Volume 1 (Page 20)
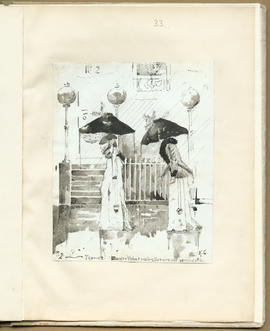
The Magazine: Volume 1 (Page 23)
The Magazine: Volume 1 (Page 29)
The Magazine: Volume 1 (Page 30)
The Magazine: Volume 1 (Page 31)
The Magazine: Volume 1 (Page 37)
The Magazine: Volume 1 (Page 38)

The Magazine: Volume 1 (Page 39)
The Magazine: Volume 2 (Page 4)
The Magazine: Volume 2 (Page 6)
The Magazine: Volume 2 (Page 20)

The Magazine: Volume 2 (Page 23)
The Magazine: Volume 2 (Page 26)
The Magazine: Volume 2 (Page 27)
The Magazine: Volume 2 (Page 29)
The Magazine: Volume 2 (Page 33)
The Magazine: Volume 2 (Page 36)
The Magazine: Volume 2 (Page 48)
The Magazine: Volume 2 (Page 49)
The Magazine: Volume 2 (Page 52)
The Magazine: Volume 2 (Page 54)
The Magazine: Volume 2 (Page 55)
The Magazine: Volume 2 (Page 57)
The Magazine: Volume 2 (Page 61)
The Magazine: Volume 3
The Magazine: Volume 3
The Magazine: Volume 3 (Page 2)
The Magazine: Volume 3 (Page 14)
The Magazine: Volume 3 (Page 15)
The Magazine: Volume 3 (Page 22)

The Magazine: Volume 3 (Page 26)
The Magazine: Volume 3 (Page 27)

The Magazine: Volume 3 (Page 41)
The Magazine: Volume 3 (Page 43)
The Magazine: Volume 3 (Page 44)
The Magazine: Volume 3 (Page 46)
The Magazine: Volume 3 (Page 48)
The Magazine: Volume 3 (Page 52)
The Magazine: Volume 3 (Page 55)